Webcam Settings
Guide to webcam overlay configuration, positioning, and real-time enhancements in EasySpecy.
Overview
EasySpecy's webcam overlay records a picture-in-picture (PiP) webcam feed composited onto your screen recording. The overlay supports customizable positioning, shapes, borders, and real-time video enhancements.
Architecture
EasySpecy uses a live browser-composited design for the webcam PiP (Picture-in-Picture) overlay. Instead of capturing raw frames from the webcam in native Rust code and compositing them via FFmpeg in post-processing, the webcam stream is captured and rendered directly inside the transparent overlay window (effects-overlay loading overlay.html) via WebRTC APIs. The final video records this visual output in real-time, eliminating latency and frame processing bottlenecks on stop.
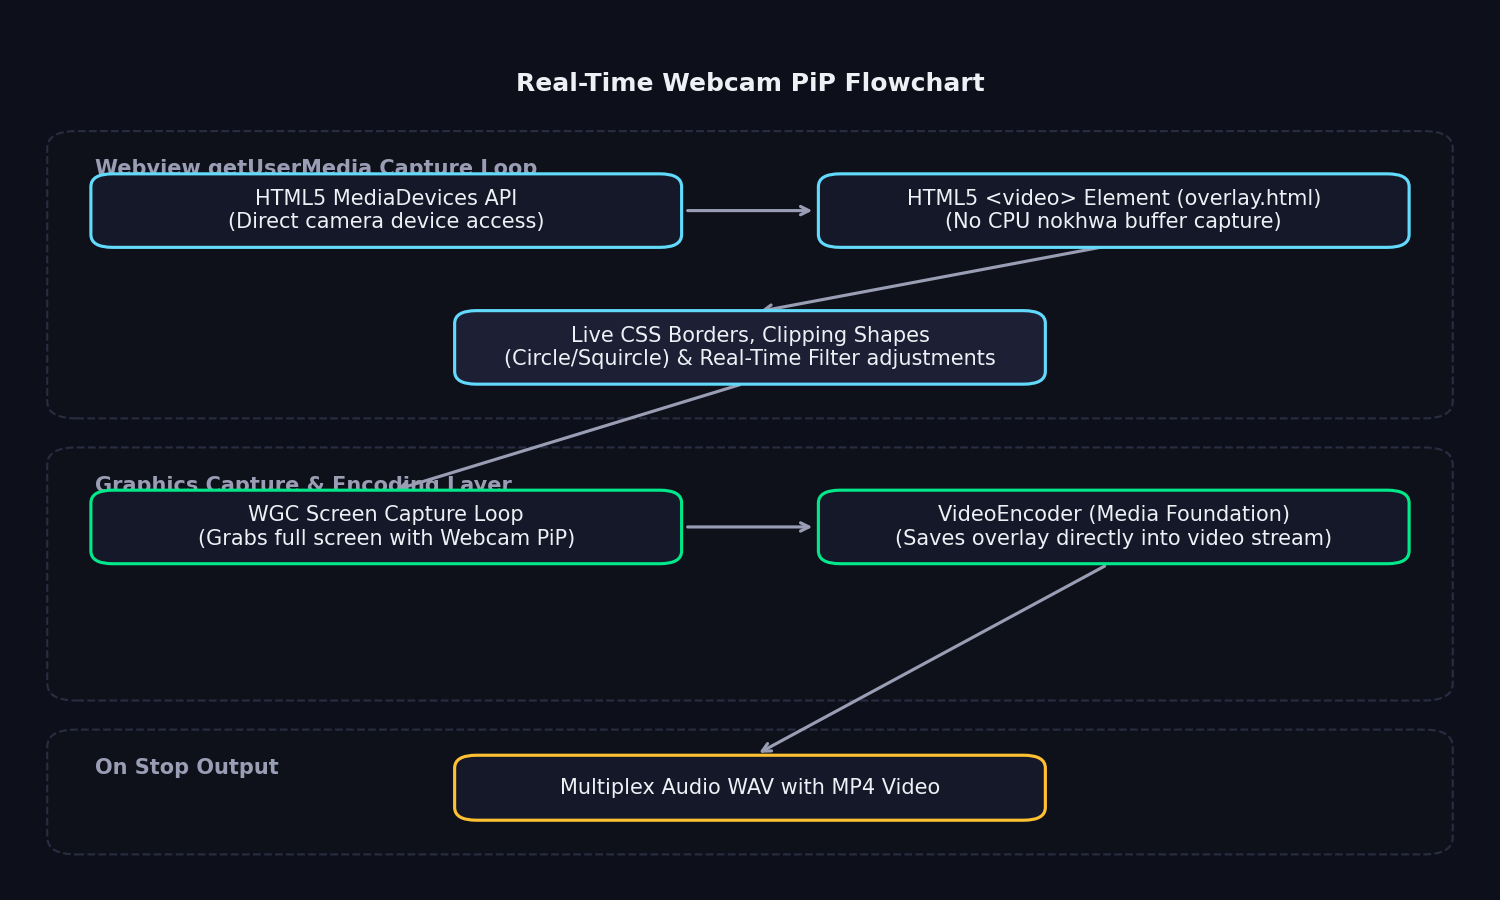
The webcam overlay works in three simple phases:
- Device Matching: EasySpecy queries camera devices via the native Rust
nokhwaAPI to display them in the settings page. When recording starts, the selected device index is passed to the Webview, which matches it using the browser'snavigator.mediaDevices.enumerateDevices()API. - getUserMedia Stream: The overlay page requests the camera stream using standard HTML5 WebRTC
navigator.mediaDevices.getUserMedia()with the matching device constraints. - Live Rendering: The stream is bound to an HTML5
<video>element styled and positioned in the overlay window. As Windows Graphics Capture (WGC) records the screen, it automatically captures the live webcam PiP window.
Synchronization
Webcam sync is managed directly by Tauri window visibility:
- The webcam overlay window starts in a hidden state to prevent flash backdrops.
- The browser stream starts fetching and playing immediately upon window creation.
- Once the first video frame is received and
CAPTURE_ARMEDfires, the overlay window is shown globally, ensuring the webcam PiP feed appears perfectly in sync with the screen recording.
Configuration
Basic Settings
# Enable webcam
webcam_enabled = true

# Device selection (empty = default device)
webcam_device = "Logitech C920"

# Position (4 corners or custom)
webcam_position = "BottomRight"  # TopLeft, TopRight, BottomLeft, BottomRight, Custom

# Size (width in pixels)
webcam_size = 240  # 160, 240, 320, 480

# Shape
webcam_shape = "Circle"  # Circle, Rectangle

# Border
webcam_border_color = "#00e88a"
webcam_border_width = 3

# Opacity (0.0 = transparent, 1.0 = opaque)
webcam_opacity = 1.0Custom Positioning
When webcam_position = "Custom", use coordinates:
webcam_x = 1500  # X position (pixels from left)
webcam_y = 800 # Y position (pixels from top)Coordinates are relative to the recording resolution, not screen resolution.
Positioning Guide
Preset Positions
| Position | Description | Use Case |
|---|---|---|
| TopLeft | Top-left corner, 20px margin | Minimal intrusion, good for UI demos |
| TopRight | Top-right corner, 20px margin | Standard for tutorials |
| BottomLeft | Bottom-left corner, 20px margin | Alternative to TopRight |
| BottomRight | Bottom-right corner, 20px margin | Default, least obtrusive |
Custom Positioning
- Enable webcam in settings
- Open the webcam preview panel
- Drag the overlay to desired position
- EasySpecy automatically calculates
webcam_xandwebcam_y - Coordinates are clamped to stay within recording boundaries
Position Calculation
EasySpecy ensures the webcam stays within the recording area:
x = max(0, min(recording_width - webcam_width, x))
y = max(0, min(recording_height - webcam_height, y))Shapes & Borders
Circle Shape
- Webcam feed is cropped to a circle using FFmpeg
geqfilter - Border renders as a ring around the circle
- Best for: Tutorials, reaction videos, professional presentations
Rectangle Shape
- Webcam feed is rectangular with rounded corners
- Border renders as a rectangle outline
- Best for: Gaming, casual content, showing more of the background
Border Customization
webcam_border_color = "#00e88a"  # Hex color or rgba()
webcam_border_width = 3 # Pixels (0 = no border)Popular border colors:
- EasySpecy green:
#00e88a - White:
#ffffff - Black:
#000000 - Transparent:
webcam_border_width = 0
Video Enhancements
EasySpecy applies real-time enhancements to webcam frames before compositing.
Sharpen
webcam_sharpen = 0.3 # 0.0 (off) to 1.0 (max)Enhances edge definition using unsharp mask filter:
0.0: No sharpening (soft image)0.3: Subtle enhancement (recommended)0.5-0.7: Noticeable sharpening1.0: Maximum (may introduce artifacts)
Brightness
webcam_brightness = 5 # -50 to 50Adjusts frame brightness:
-50: Darkest0: No change5: Slight brightening (recommended for poor lighting)50: Brightest
Contrast
webcam_contrast = 1.1 # 0.5 to 2.0Multiplies contrast:
0.5: Low contrast (flat)1.0: No change1.1: Slight enhancement (recommended)2.0: High contrast (dramatic)
Enhancement Pipeline
Enhancements are applied via FFmpeg filters in this order:
Raw Frame → Brightness → Contrast → Sharpen → CompositeReal-Time CSS Styling & Filters
Because the webcam PiP is rendered inside a Webview wrapper, shapes, borders, and video enhancements are applied instantly via standard CSS properties:
Clipping Shapes
The circular or rounded layout is handled by applying the CSS borderRadius property to the container:
- Circle:
borderRadius: 50%(standard cropping) - Rounded:
borderRadius: 20%(soft rectangular corners) - Squircle:
borderRadius: 30%(smooth superellipse emulation) - Square:
borderRadius: 0px
Borders
Glows and border outlines are rendered via CSS:
border: 3px solid #00e88a;
box-shadow: 0 0 16px rgba(0,232,138,0.4), 0 4px 20px rgba(0,0,0,0.5);Video Enhancements
Image adjustments are processed live by the GPU compositor using CSS filters, eliminating any CPU-bound image manipulation latency:
- Brightness: Mapped using
brightness(N%)where default is 100%. - Contrast: Mapped using
contrast(N%)where default is 100%. - Sharpen / Saturation: Perceived sharpness is enhanced by applying saturation adjustments
saturate(N%)to boost image definition in the Webview. - Combined Filter:javascript
video.style.filter = `brightness(${brightness}%) contrast(${contrast}%) saturate(${saturate}%)`;
Device Selection
Listing Devices
EasySpecy enumerates cameras via nokhwa:
let cameras = nokhwa::query(nokhwa::ApiBackend::Auto)
.map_err(|e| e.to_string())?;The frontend displays available devices in a dropdown.
Default Device
If webcam_device = "" (empty string), EasySpecy uses the system default camera.
Multiple Cameras
If you have multiple cameras:
- Open Settings → Webcam
- Select device from dropdown
- Preview updates automatically
- Save settings
Troubleshooting Devices
Camera not showing in list:
- Check if another app is using the camera (Zoom, Teams, Discord)
- Try closing other apps and restarting EasySpecy
- Verify camera works in Windows Camera app
Camera opens but shows black screen:
- Check physical camera cover/privacy shutter
- Verify camera permissions in Windows Settings → Privacy → Camera
- Try a different USB port (for external cameras)
Performance
During Recording
- Webcam Rendering: Handles rendering at native device rates (up to 60fps) using hardware-accelerated CSS/WebGL compositing in the Webview, consuming <1% CPU and negligible GPU.
- Disk I/O: Zero. No PNG frames are encoded or written to disk during capture, preventing disk bandwidth saturation.
- Camera Access: Directly managed by browser media APIs, optimizing memory layout.
Post-Processing
- Compositing overhead: Zero. Since WGC records the live webcam PiP frame along with the screen, there is no post-recording FFmpeg image composition overhead. The final video is ready immediately on stop.
Optimization Tips
- Ensure your GPU drivers are updated to leverage full hardware Webview acceleration.
- If you experience lag on lower-end systems, reduce the webcam size or border thickness to lower composition work.
Preview & Testing
Live Preview
EasySpecy provides a live webcam preview in the settings panel:
- Open Settings → Webcam
- Enable webcam
- Preview shows real-time camera feed
- Adjust position, size, and enhancements in real-time
- Preview updates instantly as you change settings
Position Preview
The preview panel shows:
- Webcam overlay at actual size (scaled to fit preview)
- Recording boundary (1920×1080 or configured resolution)
- Draggable overlay for custom positioning
- Coordinate display (x, y) as you drag
Test Recording
Before a long recording:
- Enable webcam in settings
- Record a 10-second test clip
- Play back to verify:
- Webcam is visible and positioned correctly
- Enhancements look good
- Audio is synced (check lip sync if speaking)
- Adjust settings if needed
Error Handling
Webcam Initialization Failure
If the camera fails to open within 5 seconds:
Error: Webcam failed to initialize within 5 secondsSolutions:
- Close other apps using the camera
- Check camera permissions
- Try a different USB port
- Restart EasySpecy
Camera Disconnected During Recording
If the camera disconnects mid-recording:
- EasySpecy continues recording without webcam
- Final output will not include webcam overlay
- Check logs at
%APPDATA%\easyspecy\logs\easyspecy.log
Low FPS Warning
If webcam FPS drops below 10:
- Check USB connection (use USB 3.0 if available)
- Reduce webcam resolution in camera settings
- Close other apps using system resources
Platform Support
Windows (Full Support)
- ✅ All features (capture, enhancements, compositing)
- ✅ Hardware acceleration (via FFmpeg)
- ✅ Multiple camera support
- ✅ High FPS (60+) capture
macOS (Basic Support)
- ✅ Camera capture (AVFoundation)
- ✅ Basic compositing
- ❌ Enhancements not yet implemented
- ❌ Custom positioning not yet tested
Linux (Basic Support)
- ✅ Camera capture (V4L2)
- ✅ Basic compositing
- ❌ Enhancements not yet implemented
- ⚠️ May require manual V4L2 driver installation
Advanced: Webcam Capture Loop
For developers interested in the implementation:
fn webcam_capture_loop(dir: &str, device: &str, target_size: u32) -> Result<(), String> {
    // 1. Open camera
    let camera = nokhwa::Camera::new(
        nokhwa::utils::CameraIndex::String(device.to_string()),
        RequestedFormat::new::<RgbFormat>(RequestedFormatType::AbsoluteHighestFrameRate),
    )?;

    // 2. Capture test frame
    let frame = camera.frame()?;
    WEBCAM_READY.store(true, Ordering::SeqCst);

    // 3. Wait for sync point
    while !WEBCAM_ARMED.load(Ordering::SeqCst) {
        std::thread::sleep(Duration::from_millis(10));
    }

    // 4. Capture frames
    let mut frame_count = 0;
    while !WEBCAM_STOP.load(Ordering::SeqCst) {
        let frame = camera.frame()?;
        let png_data = encode_png(&frame, target_size)?;

        // Offload to writer thread
        send_to_writer_thread(png_data, frame_count);

        frame_count += 1;
        WEBCAM_FRAME_COUNT.store(frame_count, Ordering::Relaxed);
    }

    Ok(())
}The webcam system is designed for reliable capture with zero impact on screen recording performance. All heavy work (PNG encoding, file I/O) happens on separate threads.