Cursor Settings
Complete guide to cursor customization, trail effects, and click animations in EasySpecy.
Overview
EasySpecy provides professional cursor customization with two independent systems:
- Cursor Packs — Replace your system cursor with custom designs during recording
- Cursor Trails — Render smooth, animated trails behind the cursor in post-processing
Both systems can be used simultaneously or independently.
Cursor Packs
Cursor packs replace your Windows system cursor with custom .cur files during recording. The original cursor is automatically restored when recording stops.
Available Packs
| Pack | Description | Author |
|---|---|---|
| System Default | No change — uses your Windows cursor | Windows |
| macOS | Apple's cursor with shadow — clean and iconic | Community |
| Posy's Improved | Crisp black with white border — the internet's favorite | Michiel de Boer |
| Specy Classic | Clean capture layout with green accents | EasySpecy |
| Specy's Glasses | Glassmorphic body with glowing indicators and holographic rings | EasySpecy |
How Packs Work
Each pack contains 10 cursor types:
- Arrow (normal pointer)
- I-Beam (text selection)
- Hand (links)
- Cross (precision)
- Size We/Ns/NwSe/NeSw (resize handles)
- Size All (move)
- No (forbidden)
During recording, EasySpecy calls SetSystemCursor to replace all cursor types. When recording stops, SystemParametersInfo(SPI_SETCURSORS) restores the original cursors.
Configuration
# In config.toml
cursor_pack = "default" # default, macos, posy, specy_classic, easyspecyCustom Packs
Create your own cursor pack:
Create a folder in
%APPDATA%\easyspecy\cursors\your-pack-name\Add
.curfiles with these names (any subset):arrow.cur,normal.cur, ordefault.cur(required)ibeam.cur,text.cur,beam.curhand.cur,link.curcross.cursizewe.cursizens.cursizenwse.cursizenesw.cursizeall.cur,move.curno.cur,forbidden.cur
EasySpecy will automatically detect the pack and list it in settings
Platform Support
Cursor packs are Windows-only. The pack system uses SetSystemCursor from the Windows API, which is not available on macOS or Linux.
Cursor Trails
Cursor trails render a smooth, animated vector path behind the cursor position. Trails are rendered live and in real-time inside the transparent, click-through Tauri overlay window (effects-overlay), and are recorded directly into the output video by the Windows Graphics Capture (WGC) loop. This real-time approach minimizes post-processing latency and ensures the video is ready immediately on stop.
Trail Styles
| Style | Description | Visual |
|---|---|---|
| Glow | Soft glow around cursor path with fading opacity | Luminous, subtle |
| Particles | Stream of glowing particles decaying over time | Magical, energetic |
| Ribbon | Sleek solid line with custom dash styling | Modern, clean |
| Dots | Discrete circular nodes connecting recent positions | Minimal, precise |
| Aurora | Color-cycling fluid wave following cursor movement | Vibrant, organic |
Trail Rendering Architecture
Trails are rendered on screen at 60 FPS using an event-driven HTML5 <canvas> inside overlay.html:
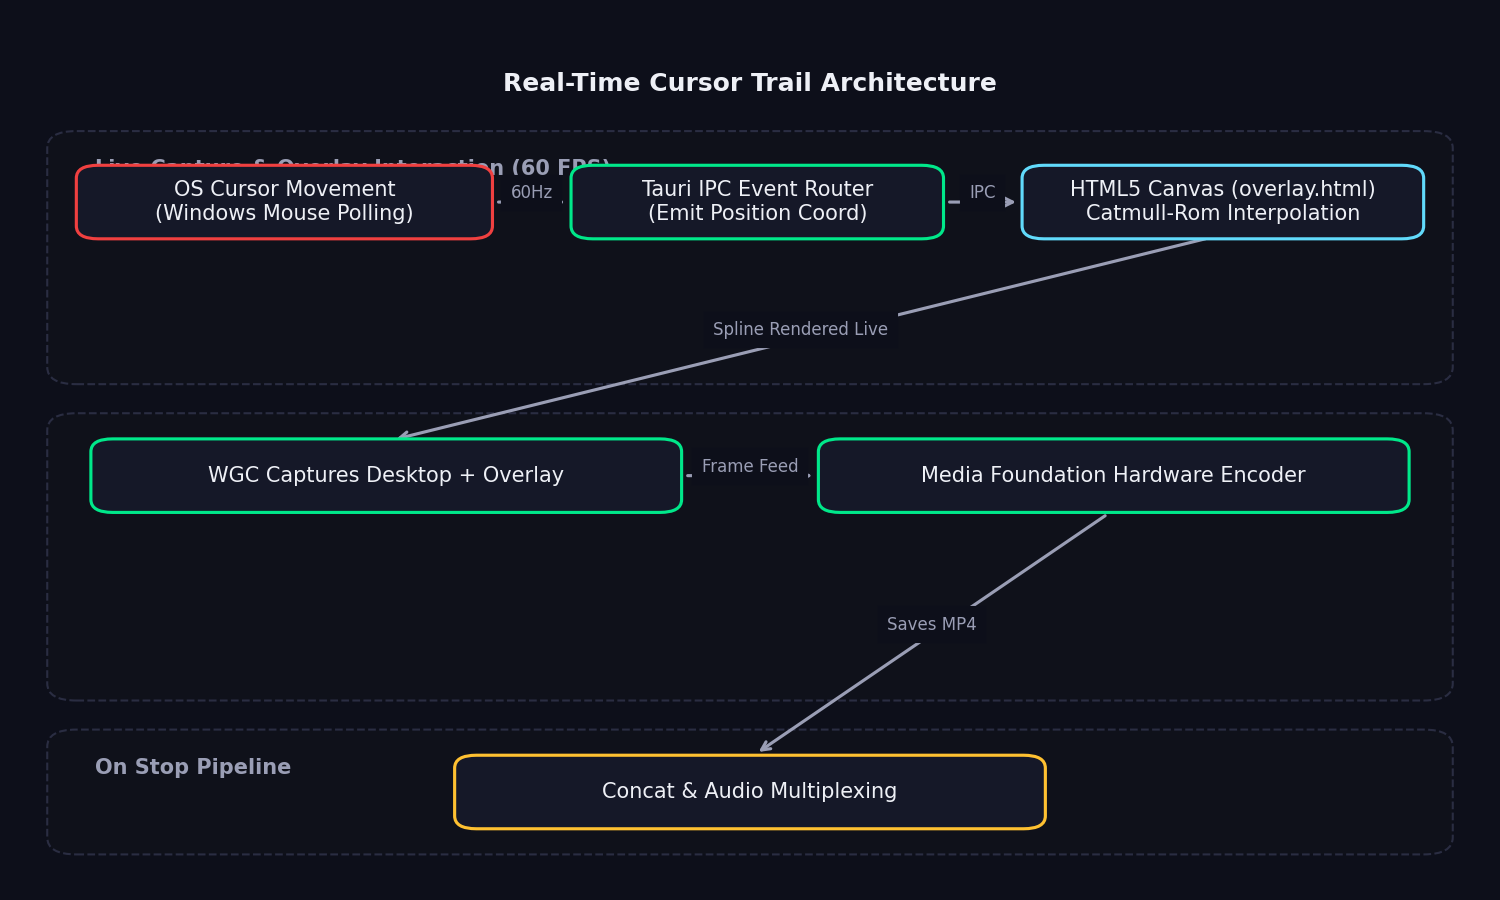
The loop operates in three steps:
- Poll: During recording, a background Rust mouse listener thread polls Windows cursor coordinates at ~60Hz and detects clicks.
- Broadcast: The coordinates are instantly broadcast as Tauri IPC events (
cursor-move,cursor-click) to the overlay window. - Interpolate & Render: The Canvas script receives coordinates and applies real-time Catmull-Rom spline interpolation between samples to ensure a smooth, gap-free trail at the display's native refresh rate, completely eliminating frame latency.
Configuration
# Enable trails
cursor_trail_enabled = true

# Trail appearance
trail_style = "glow"              # glow, particles, ribbon, dots, aurora, none
cursor_trail_color = "#00ff88"    # Primary color (glow, ribbon, particles start)
cursor_secondary_color = "#ff4488" # Secondary color (right-clicks, aurora cycles)Trail Colors
- Glow / Ribbon: Draws a path with
cursor_trail_color, fading out in opacity. - Particles / Dots: Decays from
cursor_trail_colorto transparent. - Aurora: Cycles colors dynamically starting from
cursor_trail_colorand usingcursor_secondary_colorfor gradients.
Smoothing
Smoothing uses a real-time Catmull-Rom spline interpolation algorithm. It ensures that even during fast mouse movements across the screen, the trail renders as a continuous, elegant curve without breaks or jagged vertices.
Click Effects
Click effects render an animation at the cursor position live on the screen when you click.
Available Effects
| Effect | Description |
|---|---|
| Ripple | Expanding concentric circles fading out (default) |
| Spotlight | Translucent radial gradient focusing on click |
| Ring | Sleek singular expanding ring |
| Pulse | Quick scale-up and rhythmic vibration |
| Confetti | Burst of multi-colored falling physics particles |
| None | No click effect |
Configuration
click_effect = "ripple" # ripple, spotlight, ring, pulse, confetti, nonePerformance Impact
During Recording
- Cursor Overlay: Hardware-accelerated Webview canvas rendering uses <1% CPU and negligible GPU.
- Mouse Hook Polling: Lock-free atomic coordinate checking runs in a low-priority thread, consuming <0.1% CPU.
- Total Overhead: Practically unnoticeable, keeping your computer's resources free for screen capture and encoding.
Post-Processing
- Trail rendering overhead: Zero. Since all effects are composited live and burned-in by WGC, there is no rendering or encoding of trails during the post-processing phase.
Optimization Tips
- For lower-end GPUs, choose simpler trail styles like Dots or Ribbon rather than physics-intensive ones like Particles.
- Disable trails entirely (
cursor_trail_enabled = false) if you prefer a clean desktop recording.
Troubleshooting
Trail has gaps or appears jagged
- Enable
cursor_smoothing = true - Increase capture FPS (higher sample rate = smoother path)
- Check if another app is modifying cursor position
Cursor pack not applying
- Verify you're on Windows (packs are Windows-only)
- Check
%APPDATA%\easyspecy\logs\easyspecy.logfor errors - Ensure
.curfiles are valid Windows cursor files
Cursor not restored after recording
- EasySpecy automatically restores on stop
- If recording crashes, restart EasySpecy to restore cursors
- Manual restore:
SystemParametersInfo(SPI_SETCURSORS)via PowerShell
Rainbow trail looks wrong
- Verify both
cursor_trail_colorandcursor_secondary_colorare set - Use hex format:
#RRGGBB
Advanced: Trail Rendering Pipeline
For developers interested in the implementation:
// 1. Collect cursor samples during recording
struct CursorSample {
    x: f32,
    y: f32,
    timestamp_ms: f64,
    click: Option<ClickType>, // Left, Right, Double
}

// 2. Post-recording: pre-smooth entire path
let smoothed = catmull_rom_spline(&samples, interpolation_factor);

// 3. Pre-compute trail segments in parallel
let segments: Vec<TrailSegment> = smoothed.par_iter()
    .map(|sample| compute_trail_segment(sample, config))
    .collect();

// 4. Batch-render frames (2x CPU cores)
let batches: Vec<_> = frames.chunks(num_cores * 2).collect();
batches.par_iter().for_each(|batch| {
    for frame in batch {
        render_trail_onto_frame(frame, &segments, config);
    }
});

// 5. Pipe to FFmpeg in order
Command::new(ffmpeg)
    .args(["-i", "frames/%06d.png", "-c:v", "libx264", "output.mp4"])
.output()?;The trail system is designed for maximum quality with minimum impact on recording performance. All heavy computation happens after recording stops.